Friday, July 22, 2011

Knitted Black Fly and Bee

Hi all. I hope you are all enjoying the summer weather. Where I live we have a lot of black flies late spring and early summer and  mosquitos till first frost. I made some changes on my knitted black flies and mosquitos because I wasn't too pleased with the way I did the wings and legs on the earlier versions. I'm much happier with these ones. And these guys neither bite nor sting you.

I made dangly legs with little beads for feet. The wings were knitted with a sparkly yarn and a worsted weight one together. This way they were a little firmer and had some shine to them. I used worsted yarn also for the body of the bee and black fly. And I thought I would add a stinger to the bee though in the photo it doesn't show up too well.

I'm working on a few ideas to make my photos better. There is so much to learn and whenever I learn one thing I find out that there is still more I want to learn whether it is about photography, knitting, jewelry making or whatever. Oh my.  But that is a good thing, isn't it?


Here is the revised version of the black fly from the back showing his dangly legs.

And here he is showing his great big teeth. Yes the black flies in northern Ontario are particularly deadly.

The revised bee showing his stinger.

The face of the bee.

And showing his wings better.

The mosqitos are also getting a makeover plus I am planning to make a few other flying critters between working on other projects. Come back often to visit, you never know what might fly in here.

Friday, July 15, 2011

Hello everyone. A few weeks ago a friend of mine mentioned needing a plastic apron to keep her clothes from getting wet when doing dishes. I told her I had the same problem and we thought about different ways to make such an apron. Now I love aprons and I had  several ideas I wanted to try but I'm not fond of sewing by hand and I don't have a sewing machine. So I thought why not knit one. It would have to be cotton yarn but all I had were odds and ends left over from when I had a dish cloth and soap bag knitting frenzy.

After two false starts I came up with this. By the time I had the darn thing knitted  I was in absolutely no mood to knit the ties and just made the twisted cords instead. You would think something as simple as an apron would be easy to design. Hah! Knitted fabric is heavy so the darn thing sags. Also it is too busy looking what with all the different colors. But hey I used up a lot of my cotton yarn stash.

I tried to get a photo of me wearing it to show you how it looks on but it was scary-funny. Darn it's hard to get a good photo if you have to take it yourself, lol. I still have enough yarn left to make several small items. Let's hope they turn out better. Bye for now.


Friday, July 8, 2011

Copyright Theft

Hi everybody. Sorry I was away for so long but I had some problems I had to solve before I could devote my time properly to my blog. I was planning on having a new item to show you but it is taking longer to finish than expected. It is often the simple things that I have design troubles with. So rather than have nothing I decided do a post about copyright theft.

I found a website that has the best explanation of what copyright theft is and how it affects everyone involved and I would like to share it with you.


Here is the link.  http://www.craftdesigns4you.com/stop.htm  

Monday, May 23, 2011

Knitted Mosquito

Hi everyone! We've been having lovely weather here in Cobalt. I finally got to put my garden (such as it is) out on the balcony. My cucumbers are all of 1/4" long lol. Everything is growing fine. And I have been busy walking around Cobalt taking dozens of photos. And knitting a  mosquito in several different variations, one of which I have for you today.


I tried different ways to make the mosquito's "needle" and this way was the simplest but I'm not quite happy with it. I also came up with various ways to make the legs and wings but am still working on ways to make them better. Got a few more ideas to try.

I want to make a standing version and have an idea for it which I will try with a smaller mosquito as this guy is too big for it to work. Look for more knitted mosquito variations in the weeks to come as well as other creepy crawlies as I have more in the works.

Monday, May 9, 2011

Knitted Black Fly

Hi all!  Well spring has finally come to Cobalt. Yay!  The weather is perfect and if I had my way it would stay like this until fall.

Here is the black fly I mentioned last Monday. I always tell everyone that the black flies up here have teeth as they can really chew the heck out of you. Then until the bites heal it looks like you have some kind of nasty skin disease. Oh they're terrible little toothed beasties for certain.

For the black fly wings I used this sparkly yarn. The body was knitted with a slightly fuzzy yarn which I thought was black when I started knitting and I didn't realize until I was finished that it was a very dark blue.

I used the same pattern as I did for the bumble bee wings and  stiffened them with tacky glue. This time I sewed the two wings together before I attached them.The legs are simply lengths of yarn run through the bottom and stiffened with clear nail polish. Two little beady eyes and the teeth completed the black fly. I hope you enjoy this little critter. See you all next Monday.


Monday, May 2, 2011

Knitted Bumble Bee

Hi everybody. Just a quick post today to show you the first in a line of knitted insects. Today I have a cute knitted bumble bee. It didn't turn out as nicely as I hoped, but, hey! one learns from ones mistakes. The next critter will be better and I will make an improved version of the bumble bee as well. Check back in a few days.


The wings were fussy to make. I stiffened them with diluted tacky glue and when that didn't quite work the way I wanted I used clear fingernail polish.

The legs were stiffened with glue and the antennas with clear nail polish. But they were way harder to attach than I expected. Argh! And all the parts are not exactly placed either. It seemed so simple on paper lol.

The next ones will be better. I came up with alternate ways to do the wings, legs and antennas. Hope they turn out better.

Tuesday, April 5, 2011

Recycling Jewelry

Hi. We're not having much of a spring here in Cobalt yet. Yesterday morning we had not only snow but freezing rain and rain. All within a few hours. YUK! Today it is snowing off and on. Hello, Spring! Yoohoo! Did you forget us?

I love thrift stores. You never know what you can find. My favorite things to look for are jewelry. Sometimes you find a necklace with really awesome closures, especially the older pieces. Or the necklace is not very nice but there are some beautiful beads in it. Or like I'll show you today there are earrings that can be recycled for embellishments. And, yes, sometimes I find jewelry that I will wear as is.


Here are some of the large earrings in my collection that I will use as embellishments on felted bags or that will become part of a new item of jewelry. Some will be used to cover up the closure like I did on the felted bag I showed you earlier. 

These earrings can be taken apart and sewn on a bag or other item using the hole where the jump ring was holding the two pieces together.

Same with these ones. They are easy to recycle.

And I think they will look prettier being recycled on a felted bag, for example, than as earrings.


Here is a wee felted bag with an old brooch that I discovered in the thrift store. You're limited only by your imagination. Any piece of jewelry can be recycled. Even broken pieces.


Tuesday, March 29, 2011

Dyeing Buttons

Still waiting for spring here. Hope the weather is pleasant where you are. Yesterday I finished sorting out a large jar of old buttons I had recently purchased and there where some white ones that didn't look too good. So I decided to dye them. I had tried it last year with some and got excellent results using turmeric for yellow and henna for brown. The substance the buttons are made from decides how effective the dyeing  will be.
Below you can see the white buttons as they started out.


Here they are after being in turmeric for one hour.


This is what I used to dye them in. I put a tablespoon of turmeric in a cup.


More white buttons waiting to be dyed.


These were left in henna using the same method as for the turmeric.


None of these white buttons really took the dye too well. The ones I did last year came out way better. The ones in the photo below have a more intense color. I used white buttons that were not in very good condition. Some of the ones in the upper left corner had hairline cracks in them and the henna got into them and gave them an interesting effect.

I was surprised to see that the henna turned the buttons brown instead of red like my hair. But I am very pleased with the various shades of brown I got. Also with the yellow. Now these rejuvenated old buttons can have a new life.

Tuesday, March 22, 2011

Felted bag using recycled purse closures

Hello. Glad you could make it. I hope spring has sprung where you are. Yesterday we got more snow which is melting again now in the afternoon sun.

Today I have a second felted bag to show you. For this one I recycled the magnetic closure from an old purse that had its day. Some time ago I realized the old closures and other hardware can be recycled from purses. Now I cut out all the magnetic closures and anything else that can be reused. This includes the straps, pieces of the material and the zippers. Anything can be recycled with a bit of imagination.

The body of the bag was knitted and the strap was made with a French knitter. The magnetic closure's tabs were opened with the edge of a butter knife. Use the top edge so as not to ruin the working edge. They can be hard to open. I used my thumb nail to push it up enough, when necessary, to give the knife blade room to get underneath. Then once they were in place I used my hammer to slowly push them closed again.
The finished bag.

Close up to show how fuzz it is.

The magnetic clasp.

I just cut them out and save them for a later project.

This shows how they are attached.

And this shows them once I worked them apart.
To hide the clasp I found a big button from my (huge) collection to sew over it. I was going to add some embellishments but decided against it for this one.

This is one of my French knitters. I've had it for over 30 years.


I hope this inspires you to try out ideas of your own. I welcome any comments or questions. I'd love to hear from you.

Wednesday, March 16, 2011

Zigzag Knitted Scarf

Winter is almost over. YAY!  Soon I can start my balcony garden. Get all the little plants out there so they can grow into yummy veggies. I love my veggies!

Here are two knitted scarf patterns that I designed this winter. The second one isn't finished as I just wanted to try out the pattern with some yarn ends to see how it looked. Now I plan to finish all those projects that I started and left "for the time being" and never did get back to.

Do any of you have a backlog of projects waiting to be finished? And what are they if any? Me?  I have a growly bear, two dolls, a ladybug, a spider and a bumble bee to finish. That's just the knitting. There are also several jewelry pieces I need to finish. Gotta run...I hear them calling me.

Here is the finished one.

This is is the "try out" piece to see how the second pattern looks

Tuesday, March 8, 2011

Some Doll Items

Hi. I didn't get the felting done that I had planned to show you today as I had other things to do that needed my attention. One item I was working on was to make a "photography studio" but as you will see spray painting is definitely NOT my forte. I will later wallpaper it with wrapping paper. Or somethng.

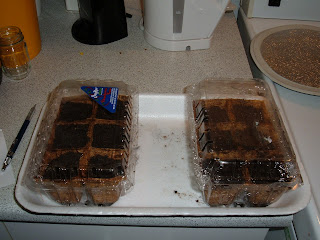
Another thing I was working on was getting my balcony garden started. I sowed cucumbers, pickling onions, beets and radishes so far. I used pots made from coconut fiber and used clear plastic containers I found in the recycle bin as mini greenhouses.

And I fixed the strap of the little felted bag from last week. I was really not happy with the one it had. The new strap is an old necklace I recycled. I buy second hand jewelry and take it apart and make new items with them.

A few years ago I got into knitting cotton dishcloths. I also was working on doll clothes and thought why not make a doll sized dishcloth. There is also a felted tote bag I made and a pink bikini. An odd trio of items to be sure. But here they are.


The pink bikini and the felted tote.
The tote and the dishcloths.  And my bad paint job.  : (
The felted bag with its new handle.
My mini greenhouses.

Tuesday, March 1, 2011

Small Felted Bag

Hi everyone. A year or so ago I got interested in making felted bags. The first two I gave away and unfortunately I don't have a photo of them. I started several more but then I got sidetracked with other knitting. This week I finally finished one of the bags. It is a very simple design. I love the way the bags get so super fuzzy. It was a total surprise to see how fuzzy they get. I have three more in the works which I hope to finish this month. One is a hobo bag for my daughter which I should have finished absolutely ages ago and the other two are small ones. These will be finished more elaborately with a lot of embellishments.

Felting is so much fun. I've made cat toys for my daughter's cat. A doll sized tote bag which you will see in a few days. Pincushions, beads, and a scarf are felting projects I hope to complete this month yet as well.


The strap turned out to be too wide.

And the flap ended up being too small. (Sigh)

See you next Tuesday with more felted items. TTFN

Tuesday, February 22, 2011

Knitted Doll Pattern

Sorry I wasn't here last Tuesday as promised. I was struck down by a killer headache and then had to deal with some family problems. But here is the pattern finally. If you have any problems or questions please contact me and I will do my best to help you.

Doll Pattern

I used worsted yarn held double and 4.5 mm needles. The gauge is 20 sts and 26 rows  to 4"  The doll is knitted in stocking stitch throughout.

Body

Make two pieces

Cast on 10 sts
Knit 1 row
Purl 1 row
Inc 1 st at each end of the next 2 knit rows
Knit even for 4 1/2"
Cast off

Head

Cast on10 sts
Knit 1 row
Purl 1 row
(k1, inc in next st ) 5x
Purl 1 row
(k2, inc in next st) 5x
Knit even for 9 rows
(k3, k2 tog) 4x
Purl 1 row
K 2 tog across
Cut yarn, thread end on needle and draw through the 8 sts and draw together and secure tightly

Legs

Cast on14 sts
Knit even for 4 1/2"
Change to shoe color
Knit even for 1/2"
Knit 2 tog across
Cut yarn, thread end on needle and  draw sts together and secure tightly

Arms

Cast on10 sts
Knit 2 1/2" even
Switch to face color for hand
Knit even for 1/2"
Knit 2 tog across
Cut yarn, thread end on needle, draw sts together and secure tightly.

Yarn Wig

Cut a 4" by 3" piece of cardboard and wrap the yarn around the 3" width several times. Then back stitch across the yarn in the middle on one side. This secures the yarn and makes a part. Then turn the cardboard over and cut the yarn along the middle as shown in photo. Glue with tacky glue to the dolls head, arranging the yarn to frame the face. Once the glue is dry trim the ends to make them even. You can cut bangs if you wish.


Here is the poem that went with the doll when it was given as a frustration doll. It's bit wild but then I have a weird sense of humor. Just so you know. Don't say you haven't been warned.

When you want to tear your hair
Or toss a certain person out
When you can't say what you want
And you really need to shout
Just grab this doll instead
And slam it all about
Or twist its little neck
Or trample it with your feet
Or imagine if you wish
Tossing it on the street
And running it over with your bus
Many times
Back and forth
Over and over again.

Then when you're feeling better
Just continue on your way
And nothing else will bother you
For the rest of your day.


Oh and just so you know, no passengers were harmed. Ever. Honest.

Tuesday, February 8, 2011

Simple Knitted Doll


Today I have a simple knitted doll. A good pattern for beginners to make. It is easy with just the basic stitches. Knit, purl, increase and decrease. The face is just a few quick stitches but you can use felt pieces for the features. Beads or googly eyes. The hair is a yarn 'wig' which can be sewn or glued on.

I first made this pattern as a frustration doll for a gift and also wrote a funny poem to go with it. It was for the same person who I gave the voodoo doll to. I will post the pattern and poem next Tuesday. I need to write it out so it makes sense first. The way I write out the patterns when I am developing them won't make sense to anyone else. Heck, if it's a pattern I haven't worked on for a few months it takes me some time to remember what the cryptic notes and doodles are supposed to represent.

My next projects will take me away from dolls and toys for awhile. Felted bags, recycled jewelry and fashion doll clothes and accessories are next on my list.